So I ran a talk at the Pardot London User Group on how to use a CDN to help speed up your pages and delivery content pages quicker.
This is me converting that talk into a step by step guide for a hopefully a Pardot Admin to setup there on CDN (Content Delivery Network) on AWS (Amazon Web Services).
Setup an AWS Account
Step 1: Setup an AWS Account .
Register a Domain
Choice Number 1: Address for your content delivery. i.e static.pardotlondondemo.com If you already have a domain setup and hosted you would need to adapt these steps in places, if there is demand I will write a blog post showing the difference. . i.e You want to use the company domain for me that would be ebsta.com for example. But for the purpose of this blog post I am going to show an end to end solution.For most people in Marketing this will not be in there control so for today I am going to also show you how to setup using a domain bought from Amazon. This will smooth the process of setup and also means you content setup is completely separate from any corporate domain name setup. This should help you test and also configure before you decided to use a corporate domain in the future.
Step 2: Let's setup a Domain (Website Address i.e pardotlondondemo.com) . In the services Drop down type : Route 53

This will be the way find all the services we need in AWS.
Select Route 53. This is Domain Name Services (I have linked explanation) in AWS.
Step 3: Register a domain. Once you have decided on a domain it is time to register it.
Step 4:
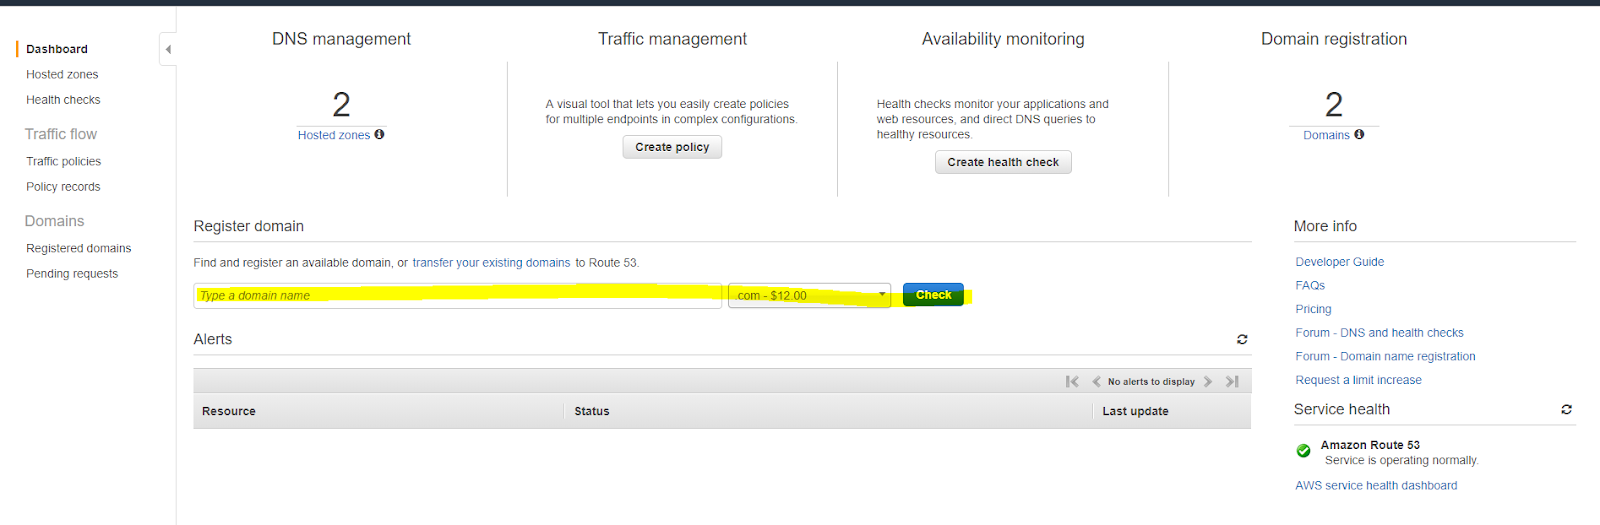
In the box Type a Domain type in a domain name you would like to use. i.e in my case pardotlondondemo I have chosen also .co.uk from the drop down.

We run a check first to see that it is not already registered to someone else and once we find a name that is not we are able to purchase it.

We "Add to Cart" and click Continue at the bottom.
Step 5:
We then go through the next two steps Register the domain . If this company you may want to make sure you check to register it to a company address and company details. It is important you get these correct. So if in doubt ask I.T department. Once you have completed the Contact Details and you will be asked move onto the Verify Purchase process check your details are 100% correct here.
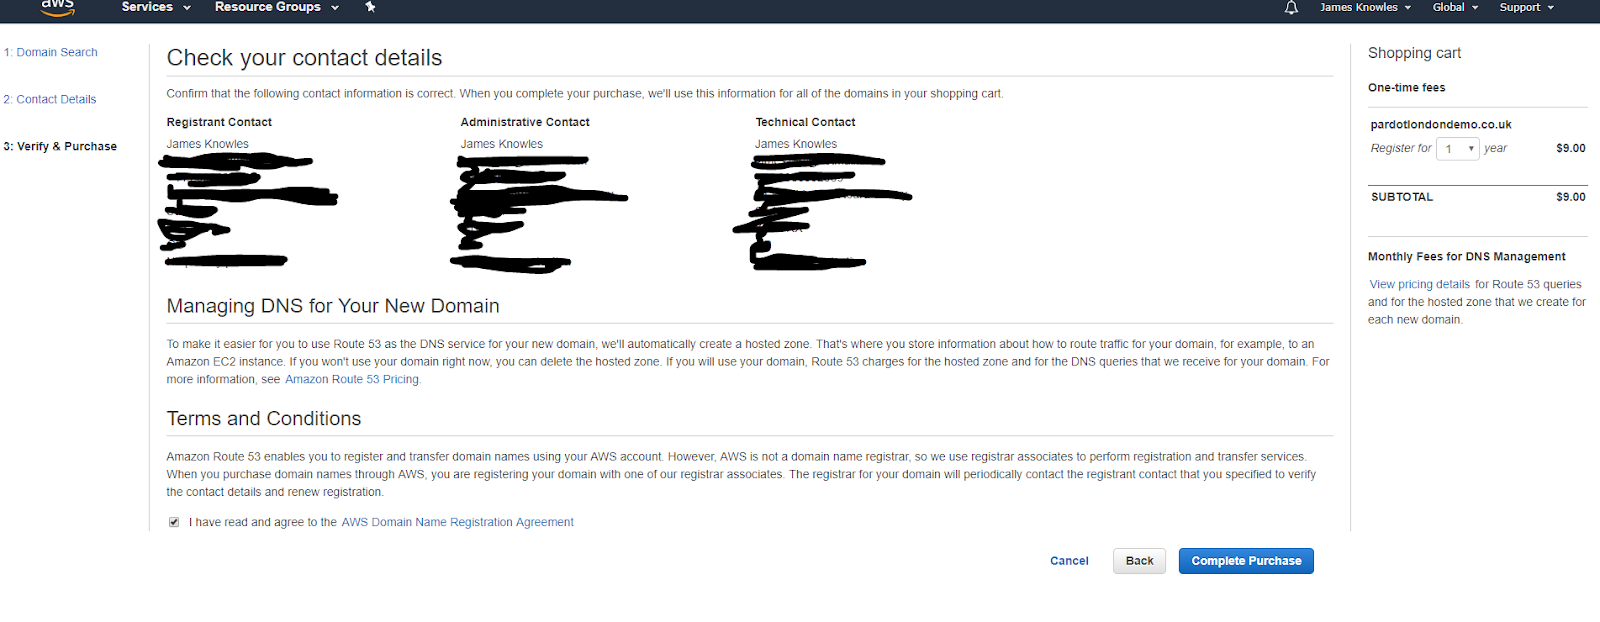
Once happy with your details. Check the Terms and Conditions box and "Complete Purchase".
Note the this :

This will be different depending on the type of domain your registered i.e .com / .co.uk / .net so worth reading this.
We click to "Go to Domains"

Right This might be Cup of Tea time or Coffee.. But we can do at least one thing while we wait. Lets setup S3 Bucket.
Setup a S3 Bucket
Step 1:We go to Services drop down again and type s3

What is S3 while in simple terms it like a Cloud Hard Drive services. It allows you store massive amounts of files easily.
We then get to the screen that looks at bit like this.

Step 2: We want to push the button Create bucket
Step 3 : Enter a bucket Name i.e I am using "pardotlondonuk" and make sure the region is US East (N. Virginia)

Click Next
Don't make any chances on the "Set Properties" just click Next button again.
Don't make any chances on the "Set Permissions" just click Next button again. Very important you don't change the defaults here.
On the Review click "Create Bucket" and you are good.
Bucket Creations is generally very quick and you should see in your view the new bucket and specifically on the dashboard you should see 0 Public. We don't want our bucket to be public.

You can click on the bucket and you should see that is empty.
Let's leave it there and go check on our domain.
Check on Domain Registered Successfully.
In the services drop down type : Route 53
We should now hopefully have an Alert that says the following:

"Domain registration successful" for your chosen domain.
If not then we need to wait or review what problems we might have missed in the Pending Requests under the Domains left side menu.

Often this is because we have received a verification email to the address we provided and we need to click on it. Sometimes though it can simply be a matter of time for a request to go through. This now a cup of tea time or go enjoy the sunshine.
Once you domain is successful. Then lets move on the magical bit of Cloud front Services and SSL.
Setting up SSL certificate using Amazon Certificate Manager
1) In the services drop down type : certificate manager

2) Make sure we are in North Virginia We want to make sure we create certificates in N. Virginia US EAST (N. Virginia)
Check you are in the right area. in the top right should see the follow next to your name.

If not select the drop down and make sure you are on it.
3)
Right once we are happy we are there let's get started with Request a certificate request.
Push the button: Request a Certificate
We should see the following :

Check the box if not already checked: "Request a public certificate" click the button Request a Certificate
4) Enter our domain of our Certificate.
This will be the address for your static content on your domain. i.e https://static.pardotlondondemo.co.uk/
Decisions decisions. For static content I like use the name static. instead of for example www. If you cannot decided now your can use a wildcard certificate by using a * instead.
For my case though I am going to use static.pardotlondondemo.co.uk as the address I am going to server by content from. But I will put in also a provision for images.pardotlondondemo.co.uk by clicking on the "Add another name to this certificate"
It looks like this:

Once you are happy click Next
5) Validation Method:
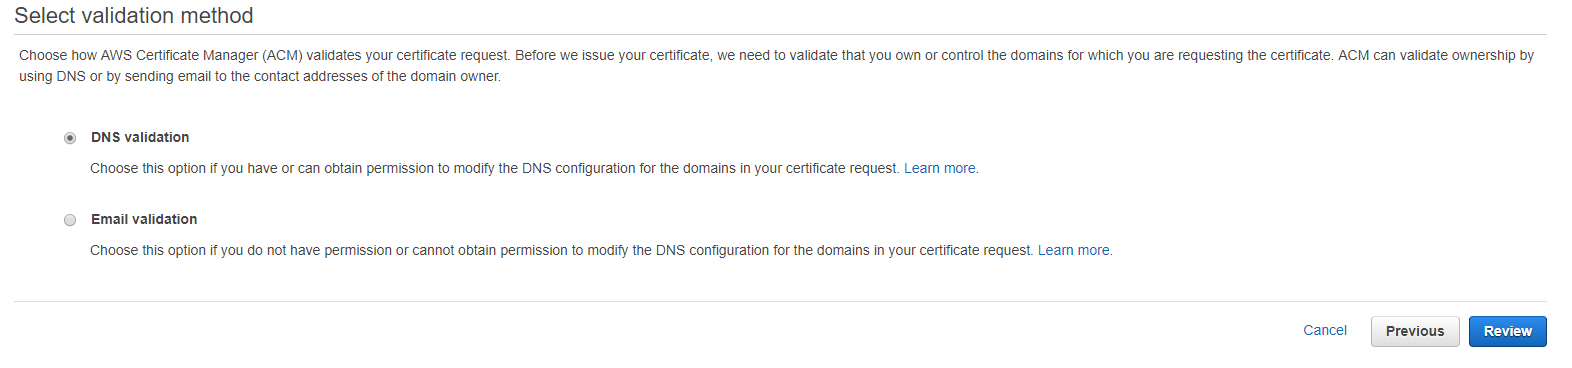
We now chose our validation method for validating the ownership of the certificate in our case we are going to use DNS validation because we already have our Domain hosted in AWS. We click Review
We review the domain and confirm it.

Make sure you don't have typo's in here and click Confirm and Request.
6) We then get to confirm our SSL by Validation, after the loading has finished we can the use the Create Record in Route 53 buttons. This is pretty simple we just drop the domains tab icon down and this gives us the details and the button. Push the Create Record in Route 53.
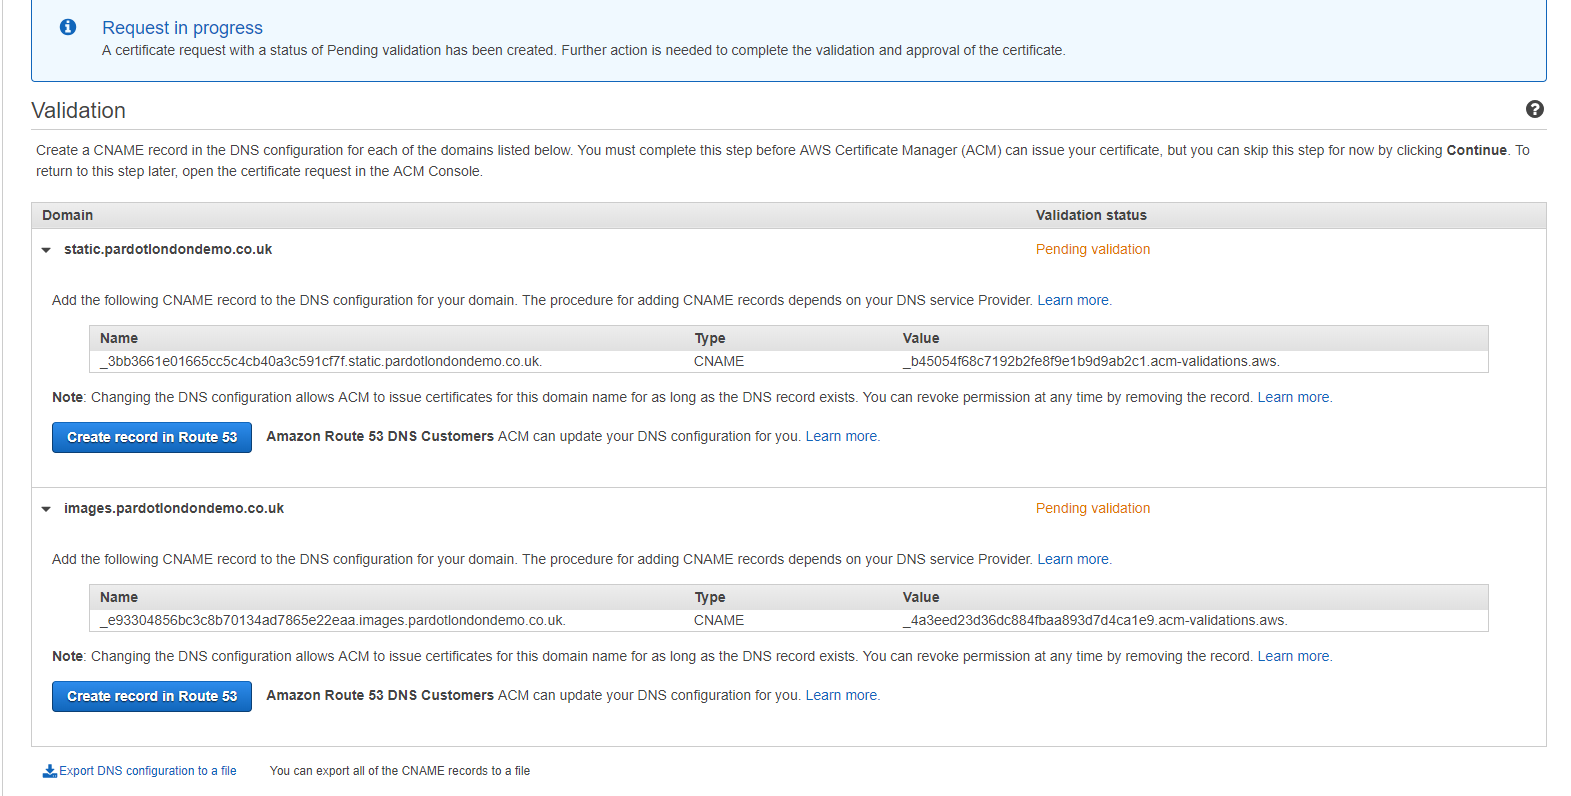
It will then give you a create record box pre filled in and your push the create button like so.

We do this for each record we want.
You should then end up with a screen like so :

We click Continue
Validation can now take up to 30 mins this time to go get a cup of tea or do something else. (in my case it took less than 5 mins)
We will need to SSL certificate to be validated before we can start Cloud Front setup the last bit of magic.
We waiting for a status of Issued:
It should look like this :

Setup Cloud Front
1) Now that we have all the building blocks in places lets gets the CDN up and running.

Type in cloudfront from the in the drop down menu on services.
2) Click the button "Create Distribution"
3) Select chose the button "Get Started" under the Web description.

4) Now we get Create Distribution screen. Which looks a touch scary to say the least.
So lets break it down settings by settings

Have highlighted what I changed in the origin settings.
Lets work our way down.
The Origin Domain Name is our S3 bucket you will be able to see this on the dropdown.
We don't set a Origin Path because we will use the root of the buckets as the base for serving content.
We want to "Restrict Bucket Access" so we check the Yes.
We want Origin Access Identity, so we check the Create a New Identity
"To require that users always access your Amazon S3 content using CloudFront URLs, you assign a special CloudFront user - an origin access identity - to your origin. You can either create a new origin access identity or reuse an existing one (Reusing an existing identity is recommended for the common use case). Additional configuration is required. In the Help, see "Serving Private Content through CloudFront"."
For Grant Read Permissions on the Bucket . Yes, Update Bucket Policy . We want the policy to connect to be updated for us.
We set one Origin Custom Headers
Allowed Origin and value of https://go.pardot.com
This is for Pardot to serve content off.
Default Cache Behavior Settings
In the Default Cache Behavior Settings we only make one change.

We just want to check the Viewer Protocol Policy to be "Redirect HTTP to HTTPS"
We want to always make sure sure our content gets served from HTTPS.
We will everything as standard in this section.
Distribution Settings

We set the alternative name to our SSL certificate address i.e static.pardotlondondemo.co.uk
We set the SSL Certificate to be a Custom SSL Certificate and we select our certificate in this case static.pardotlondondemo.co.uk
We can now leave everything else in the default state.
We get to the bottom and click Create Distribution
At this point see the status of Cloud Front Distribution we click on Distributions
At this point we need to copy the address of the Cloud Front Domain name and use it to create a CNAME in our Route 53 DNS . (Yeah that sound scary, but steps below should help) .
So I have copied into notepad : d3sbaaz616zlsl.cloudfront.net
Setting our CNAME in our Route 53.
In the services Drop down type : Route 53
We click on Hosted Zones from the left hand side menu

You can now click on your selected domain in my case "pardotlondondemo.co.uk"
This will bring you to screen where we can press Create Record Set

The create Record Set button will give you a side bar.
You want to add in prefix you set for your domain. in my case static in the name section
We then select a type of CNAME from the Type dropdown.
We select Alias to No
We then in the Value section set the name that we got from our cloudfront domain name in my case this was d3sbaaz616zlsl.cloudfront.net
Once we are happy push the Create button at the bottom of the side bar.
We should now have created a CNAME to our cloud front distribution.
We now have a line that looks like this:

We have to wait for new line to register so in the mean time lets add some content to our S3 bucket.
Adding Content to our S3 bucket
1)
We go to Services drop down again and type s3
2) Select our bucket by clicking on the name.
3) Push the Upload Button

4) Drag image or Click the add files button to select a image to upload. In my case I just uploaded a ebsta-logo.png.
5)

Because I want to keep all the default settings I just click Upload
6) My bucket now has 1 file in it and it looks like this.

The address of my file should everything have worked should be
https://www.pardotlondondemo.co.uk/ebsta-logo.png
If I now try to navigate to this image it gives me the following in Chrome:

Great Success ;)
Notice it is https served so we get a our nice secure message.
OR

This is because I have to wait for Domain name setup to still run through and Cloud front to finish it setup. Sometimes depending on your ISP this can take several hours. Hold tight and this will be cup of tea of in my case time to watch a football game time. (If you look closely though you can see I am using www.pardotlondondemo.co.uk as my address instead of static.pardotlondondemo.co.uk, this because typically my setup ran through in no time at all and so I was not able to replicate this)
If you manage to see your image then you are in business.
The next blog post will be how you get this into your pardot landing pages ;)
Bonus Next Steps
1) Enable MFA Device on your account
2) Setup a User with only Access to S3 bucket.